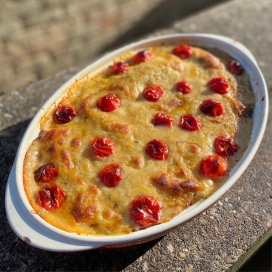
Creamy Spinach and Comté Stuffed Pancakes
Pancakes, my American mother taught me from an early age, are an incredibly versatile foodstuff. The common misconception is that they can be eaten only at breakfast time or for brunch, but, when they are prepared in a savoury way, they are the perfect base for any meal. This sentiment was backed up even more by my Dutch friend Elfi, who I met when I landed my first journalism job in London. She would often bring pancakes for lunch – the thick, crepe kind – that she would stuff and roll up with salad, meats, cheeses and more. I soon caught on added them to my desk lunch repertoire.
This wonderful lunch discovery gave me great practice in the art of pancake flipping for the annual Pancake Day party that my school friends and I take turns to host each year. If you’re looking to step away from the ‘lemon and sugar’ tradition this Shrove Tuesday or are simply wanting to try something different as a weeknight dinner, I urge you to try my recipe below. It’s a wonderfully indulgent way to eat pancakes as a main course and tops any sweet combination in my view. Happy flipping guys!
Creamy Spinach and Comté Stuffed Pancakes
(Serves 4)
Ingredients
For the Pancakes
220g Gluten Free Flour
2 x Eggs
2 x Egg Yolks
2 x Cups Milk
4 x Tablespoons Vegetable Oil
1 x Teaspoon Vegetable Bouillon Powder
50g Unsalted Butter
Salt and Pepper
For the Filling:
500g Spinach
300g Cherry Tomatoes
200g Comté Cheese, grated
1 x Teaspoon dried parsley
Pepper
For the Sauce:
1/3 x Cup Gluten Free Flour
200g Comté Cheese, grated
1 x Cup milk
30g Unsalted Butter
2 x Garlic cloves, minced
½ x 1 onion
1 x Cup white wine
2 x Tablespoons Dijon mustard
Pinch of Nutmeg
Salt and Pepper
Method
1. Prepare your pancake mixture by adding all dry ingredients to a large bowl and mix well with a wooden spoon. Beat eggs, milk and vegetable oil in a separate bowl and gradually add to the dry mixture until smooth.
2. Melt a little bit of your butter a non-stick pan over medium heat and when melted and hot, add your pancake mixture using a soup ladle which is 2/3 of the way full.
3. Let the pancake mixture cook until air bubbles appear. This is when the pancake is ready to flip, or, if you’re feeling less adventurous, turn over carefully with a fish slice. Repeat until all mixture is used up and set pancakes aside on a plate lined with paper towels and cool (this mixture will be enough to make 8-10 pancakes, depending on how full your ladle is)
4. Preheat oven to 180 degrees Celsius before moving on to the pancake filling.
5. Place spinach in a microwaveable bowl and heat for 30 seconds to 1 minute until withered. Remove and place in a mixing bowl.
6. Chop each cherry tomato into fours, setting aside a handful to decorate the pancakes before baking. Add the chopped tomatoes to the withered spinach and mix in the grated Comte cheese with a large spoon, seasoning with some black pepper and the parsley.
7. Stuff your pancakes with 1-2 tablespoons each of the filling mixture and roll carefully to form tubes. Line up the pancakes in a standard lasagne dish (I am able to fit around 8 in mine).
8. Now prepare your sauce by melting the butter in a pot and sautéing the garlic and onion until soft.
9. Remove from heat and place in a mixing bowl with the milk, white wine, mustard, nutmeg, salt and pepper. Stir with a whisk before adding the flour and then using a hand mixer, blend until smooth.
10. Return sauce to the heat and gradually stir in cheese until melted. Allow to simmer for 5 minutes before removing from heat again to cool. If the sauce is too thick for you, add a splash of milk and whisk lightly again.
11. Pour the sauce evenly over the pancakes. Halve the remaining cherry tomatoes to decorate the dish.
12. Bake in the oven for 35-45 minutes or until the dish is bubbling, and the top is golden brown.
13. Leave to cool for 5 minutes before serving with fresh leaves.


