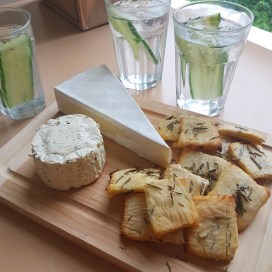
Gluten Free Rosemary Crackers
While I love to indulge in a traditional post-dinner cheese plate in true British style, sometimes I just have to give into my pre-meal craving. In the US, cheese and crackers are often enjoyed as an appetiser, and they definitely played a huge role in my household growing up. My mom would often put out a board of soft and hard cheeses with a selection of crackers and while obviously these were the gluten days, I still look back on them fondly.
After being gifted some beautiful rosemary by my friend Jessie, I decided to put it to good use and create some gluten free crackers which are naturally dairy free and can be paired with a selection of dairy free or regular cheeses. Enjoy with a cucumber gin and tonic for the perfect start to your dinner party!
Gluten Free Rosemary Crackers
(Makes Around 20 Small Crackers)
Ingredients
For the crackers:
2 x Cups Gluten Free Flour
1 x Teaspoon Xantham Gum
3 x Tablespoons Fresh Rosemary (chopped or torn)
2 x Teaspoons Rough Sea Salt
2 x Tablespoons Olive Oil
1 x Cups Water
For the Garnish:
1 x Tablespoon Olive Oil
1 x Tablespoon Fresh Rosemary
1 x Teaspoon Rough Sea Salt
Method
- Preheat oven to 225 degrees.
- Mix all the dry ingredients together in a large bowl.
- Gradually add the water and oil and mix quickly with a wooden spoon to create a dough. The dough should hold together and not stick to the spoon. If it sticks, add a little more flour to dry it out.
- Roll out the dough onto baking paper to create a layer with a thickness of around 1cm. Cut carefully into squares and separate on the baking paper before placing both onto a baking tray. Note – the squares, unless you use a cutter, will not be perfectly formed as the dough softens but fear not! I think this creates more of a rustic-looking cracker!
- Place in oven and bake for 8 minutes. Remove tray from oven and using a spatula, carefully turn all the crackers over and drizzle with the olive oil, rosemary and sea salt set aside for garnish, and return to the oven for a remaining 8-10 minutes or until golden brown.
- Remove from oven and allow the crackers to sit for 10-15 minutes before serving with an array of cheeses.