Warm Kale, Sweet Potato and Quinoa Salad with a Lemon, Tahini and Chive Dressing

To celebrate Coeliac UK Awareness Week this year, I’ve teamed up with Knorr UK to create the ultimate gluten free meal using one of my favourite grains – quinoa. I fell in love with this grain when I lived in South America and was delighted when I realised I wouldn’t have to give it up when I stopped eating gluten. It is delicious when cooked in vegetable stock – for this recipe I used Knorr Organic Vegetable Stock Pot, which gives it great depth and flavour. Try out this veggie recipe for yourselves for a perfect mid-week meal or a summery lunch.

Warm Kale, Sweet Potato and Quinoa Salad with a Lemon, Tahini and Chive Dressing
(Serves 2)

Ingredients

40g x Sweet Potato
2 x Garlic Cloves
1 x Tablespoon Olive Oil
Freshly Ground Pepper
80g x Quinoa
1 x Knorr Vegetable Stock Pot
200g x Kale

For the Dressing:
2 x Tablespoons Tahini
4 x Lemons (juiced)
1 x Garlic Clove (minced)
1 x Teaspoon Gluten Free Soy Sauce
Salt & Pepper to taste

Method

1. Preheat the oven to 190 degrees celsius.
2. Prepare your sweet potato for roasting by cutting into small cubes and then
arranging on a baking tray with the two garlic cloves. Drizzle the olive oil over the
pan and add cracked black pepper.
3. Roast for 20-25 minutes.
4. Meanwhile, prepare your quinoa by washing thoroughly before adding to a pan
with 400ml water. Add the Knorr Vegetable Stock Pot and bring to the boil. Cover
the pot and simmer for 15 minutes or until the water has cooked off and the quinoa
is soft.
5. Separately, wash and then steam the kale for six to eight minutes. Drain.
6. Start preparing your dressing by adding the minced garlic clove, tahini, lemon juice
and soy sauce to a bowl. Stir until all mixed together into a dressing consistency.
Add chopped chives and salt and pepper to taste.
7. Combine the cooked quinoa, kale and sweet potato together before serving and
adding the dressing. Serve with a lemon wedge and extra chives.

Fluffy Cloud Bread

Even though there is a wide array of gluten free bread available on the market today, sometimes I still need a break. Growing up, my mom would come up with all sorts of things for breakfast, lunch and dinner that were bread free, just to give us an alternative from time to time. I therefore never got used to bread on the table at every meal and I still see it as quite a luxury!

When I’m in the mood for something a little different, and something lighter than gluten free bread, which can often be quite heavy, I turn to my trusty fluffy cloud bread. This alternative is made from eggs and cream cheese and yet still comes out of the oven resembling bread! It makes a delicious sandwich, or accompaniment to any meal. For years I hand whisked the eggs and I am delighted to say that a brand new electric whisk has just changed my life! Let me know what y’all think!

Fluffy Cloud Bread
(Makes between 12 and 15 portions)

Ingredients

4 x Eggs (separated)
65g Full Fat Cream Cheese (I use Philadelphia)
½ x Teaspoon Gluten Free Baking Powder
½ x Teaspoon Cream of Tartar
½ x Teaspoon Freshly Ground Black Pepper
½ x Teaspoon Sesame Seeds
¼ x Teaspoon Sea Salt

Method

  1. Preheat oven to 150 degrees and line two baking trays with parchment paper.
  2. Whisk egg whites until they form stiff peaks. No liquid from the white should remain in the bowl and all the mixture should be foam that doesn’t slide across the bowl (this may take up to ten minutes).
  3. In a separate bowl, beat the yolks, cream cheese and rest of the ingredients until smooth.
  4. Spoonful by spoonful, fold the yolk mixture into the whites. Word of warning: take your time here. The quicker you go, the more likely the whites will fall flat and turn to liquid again, which is not the appropriate consistency for fluffy cloud bread.
  5. When all the mixture is combined, spoon the mixture on to the baking trays using a tablespoon. Allow at least 6cm between each cloud bread as they do spread in the oven.
  6. Bake for 15-20 minutes or until golden brown. Leave to cool for up to 15 minutes before serving in sandwich form with an array of fillings or on their own as a snack.

Low FODMAP and Dairy Free Gnocchi Alla Marie

One of the best things about starting my gluten free blog has definitely been meeting and making such lovely new friends, who have taught me so much about diets, allergies and intolerances way beyond my own knowledge and personal issues with gluten. As a way of saying thank you for being so awesome, I decided to have a crew over to my new house for dinner to celebrate. I put myself to work to create the ultimate low FODMAP and dairy free version of my classic gnocchi dish that so many of you have been able to enjoy.

With coaching and advice from the lovely Lottie aka The Tummy Diaries on the do’s and don’ts of the low FODMAP diet and top dairy free tips from the amazing Alice aka Gluten Free Alice (who also took this lovely al fresco photo of our meal), I put together the following dish so that everyone can enjoy my Gnocchi Alla Marie. I am still learning about the FODMAP diet, and as getting your hands on appropriate seasoning or stock can be difficult, I decided to feature pancetta in my dish to add extra flavour and depth. For vegetarians, the pancetta can be replaced with black olives, which can be thinly sliced and added to the dish just before baking. Happy eating!

Low FODMAP and Dairy Free Gnocchi Alla Marie
(Serves 4-6)

Ingredients

For the Sauce:
3 x Tablespoons FODMAP friendly garlic infused olive oil
1 x Carrot (peeled and finely chopped)
1 x Red Pepper (finely chopped)
800g Chopped Tomatoes
1 x Cup Red Wine
30g Fresh Basil
80g Smoked Cubed Pancetta
1 x Teaspoon Dried Chives
Salt and Pepper to Taste

For the Gnocchi:
500g Gluten Free Gnocchi
200g Vegan Mozzarella Style Cheese
30g Fresh Chives (finely chopped)
1 x Medium Courgette (diced)

Method

  1. Heat the FODMAP friendly garlic infused oil in a pot over medium heat. Add the pepper, carrot and cook until soft.
  2. Add the pancetta and cook through, stirring the mixture frequently.
  3. When the pancetta is cooked, add the chopped tomatoes, wine, dried chives, salt and pepper and let the sauce cook on a medium heat for 20 minutes.
  4. While the sauce cooks, preheat oven to 180 degrees Celsius.
  5. Boil water in a separate pot. Add the gnocchi to the boiling water and cook for two minutes, draining immediately.
  6. Place the partially cooked gnocchi in a good sized baking dish and add the vegan mozzarella style cheese (saving a handful for garnish), chives and courgette.
  7. Add the torn basil to the sauce before transferring it to a blender, or a bowl and then using a hand blender, liquidise until smooth.
  8. Gently pour the cooked down sauce over the gnocchi mixture and stir evenly. As the sauce tends to cook down even further during the baking process, I tend to use all of it but depending on preference, some sauce can be held back and either refrigerated or frozen for later use.
  9. Evenly sprinkle the remaining vegan mozzarella style cheese over the top along with some more black pepper.
  10. Place in the centre of the oven and bake for 30-40 minutes, or until golden brown on top.
  11. Remove from oven and allow to sit for 5-8 minutes before serving. Accompany with mixed leaves.

Gluten Free Rosemary Crackers

While I love to indulge in a traditional post-dinner cheese plate in true British style, sometimes I just have to give into my pre-meal craving. In the US, cheese and crackers are often enjoyed as an appetiser, and they definitely played a huge role in my household growing up. My mom would often put out a board of soft and hard cheeses with a selection of crackers and while obviously these were the gluten days, I still look back on them fondly.

After being gifted some beautiful rosemary by my friend Jessie, I decided to put it to good use and create some gluten free crackers which are naturally dairy free and can be paired with a selection of dairy free or regular cheeses. Enjoy with a cucumber gin and tonic for the perfect start to your dinner party!

Gluten Free Rosemary Crackers
(Makes Around 20 Small Crackers)

Ingredients

For the crackers:
2 x Cups Gluten Free Flour
1 x Teaspoon Xantham Gum
3 x Tablespoons Fresh Rosemary (chopped or torn)
2 x Teaspoons Rough Sea Salt
2 x Tablespoons Olive Oil
1 x Cups Water

For the Garnish:
1 x Tablespoon Olive Oil
1 x Tablespoon Fresh Rosemary
1 x Teaspoon Rough Sea Salt

Method

  1. Preheat oven to 225 degrees.
  2. Mix all the dry ingredients together in a large bowl.
  3. Gradually add the water and oil and mix quickly with a wooden spoon to create a dough. The dough should hold together and not stick to the spoon. If it sticks, add a little more flour to dry it out.
  4. Roll out the dough onto baking paper to create a layer with a thickness of around 1cm. Cut carefully into squares and separate on the baking paper before placing both onto a baking tray. Note – the squares, unless you use a cutter, will not be perfectly formed as the dough softens but fear not! I think this creates more of a rustic-looking cracker!
  5. Place in oven and bake for 8 minutes. Remove tray from oven and using a spatula, carefully turn all the crackers over and drizzle with the olive oil, rosemary and sea salt set aside for garnish, and return to the oven for a remaining 8-10 minutes or until golden brown.
  6. Remove from oven and allow the crackers to sit for 10-15 minutes before serving with an array of cheeses.

Lasagne d’Almagro

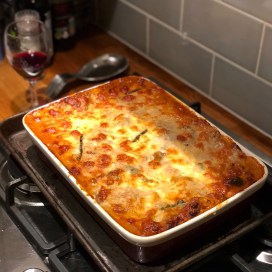
A piece of my heart will forever be in Buenos Aires – a vibrant, hectic and culturally rich city where I spent almost three years during my twenties. Beyond traditional dishes like Argentine steak and empanadas, much of the country’s cuisine was brought and developed by Italian immigrants who arrived there en masse from the 1850s onwards. A favourite dish of mine was always lasagne, prepared in its own Argentine way and featuring the smoky taste of aji molido (smoked red pepper powder) and black olives which add a natural saltiness and depth to the dish.

After becoming gluten free, I quickly released that coming across a lasagne that was safe for me to eat – in my Buenos Aires neighbourhood of Almagro and beyond – was a rare luxury, not only due to the pasta but also the stock used in the sauce. So, in honour of Coeliac Awareness Week, I have recreated this dish to make it safe for coeliacs to enjoy with friends and family. Thanks to Knorr, who create the best tasting and fuss-free stock I have ever had, this dish is bursting with flavour and completely gluten free. Knorr has been a household name ever since I remember, and I am pleased to shout about its efforts for the gluten free community. Be sure to enjoy this dish with some homemade garlic bread and a glass of strong bodied Malbec for the true Argentine experience.

Lasagne d’Almagro
(Serves 6)

Ingredients

For the Lasagne Filling:
1 x White Onion (Finely Chopped)
4 x Garlic Cloves
2 x Celery Sticks (Finely Chopped)
1 x Large Carrot (Finely Chopped)
800g Chopped Tomatoes in Juice
500g Lean Minced Beef
400g Gluten Free Sausage Meat or Sausages (Casing Removed)
160g Drained Black Olives
1 x Tablespoon Knorr Rich Beef Concentrated Stock
2 x Tablespoon Olive Oil
1 x Cup Red Wine
½ x Cup Boiling Water
2 x Bay Leaves
½ Teaspoon Dried Basil
½ x Tablespoon Gluten Free Worcestershire Sauce
1 x Teaspoon Aji Molido
250g Gluten Free Lasagne Sheets
300g Fresh Mozzarella (Diced)
100g Parmesan (Grated)

For the Béchamel Sauce:
1 x Tablespoon Butter
1 x White Onion
3 x Cups Milk
3 x Tablespoons Gluten Free Flour
1 x Cup White Wine
½ x Knorr Vegetable Stock Cube
½ x Teaspoon Nutmeg
Pepper

  1. Heat 1 tablespoon of the oil in a shallow pan over moderate heat. Add the beef and sausage meat to the pan and cook until brown (around 8 minutes), stirring occasionally and at the same time breaking up the meat with a wooden spoon.
  2. Meanwhile, take a separate, good sized cooking pot and warm the rest of the oil over moderate heat before adding the chopped onion, celery, carrot and whole peeled garlic cloves. Stir until all vegetables are soft, taking care to not burn the onion.
  3. Turn attention back to the meat once cooked through and drain fat. Then add beef to the vegetables, stirring through to make sure all vegetables are evenly dispersed throughout the mixture.
  4. Add the chopped tomatoes, olives, wine and boiling water to the pot. Stir well.
  5. Now add the Knorr Rich Beef Concentrated Stock, along with the gluten free Worcestershire sauce, bay leaves, dried basil and aji molido before stirring again and leaving to simmer for 30 minutes with a splatter guard covering the top of the pot. This will help the mixture cook down and also protect your surfaces!
  6. While your lasagne mixture is cooking, start preparing the béchamel by sautéing the finely chopped onion in butter over moderate heat in a medium saucepan.
  7. When onion is soft, add milk and let the milk almost come to boil (but not quite!) before removing from heat and whisking in the flour. Whisk vigorously for 2-3 minutes. Add the wine, nutmeg and crumbled Knorr vegetable stock cube and using a hand blender, blend the mixture until smooth.
  8. Return béchamel to heat and simmer for 20 minutes until the sauce has thickened. The sauce will still be fairly thin and pale in colour. If you prefer a thicker sauce, add 1 teaspoon of flour and whisk again. However, the consistency should not put you off – it blends beautifully with the lasagne filling during the baking process.
  9. Preheat oven to 200 degrees and start arming your lasagne.
  10. Take a medium sized lasagne dish and create layers: after removing bay leaves, ladle in one spoon of the meat mixture and smooth out to cover bottom of dish, then lay down lasagne sheets (I tend to use three sheets per layer).
  11. On top of the lasagne sheets, drizzle one ladle of béchamel sauce and smooth out to just about cover the sheets before adding an even sprinkling of fresh mozzarella and torn basil leaves on top. Repeat, leaving enough béchamel to cover the entire top layer which will then be dusted in grated parmesan cheese.
  12. Bake for 30-40 minutes or until evenly golden brown.
  13. Leave to rest for 10-15 minutes before serving and garnish with more fresh basil and mixed leaves.


Massachusetts Chocolate Chip and Cranberry Cookies

Baking cookies is something I will always associate with my time in Massachusetts when I was little. I would visit my Nana – who still practised law well into her 90s – for the summer months. I accompanied her to the office most days armed with toys and activity books, apart from when she had to appear in court. It was then that she would leave me with her dearest friend for a few hours who was always baking something delicious, even in the 90 degree summer heat (that’s a whopping 32 degrees in European terms). She taught me many valuable lessons including: 1) no brownie is complete without the addition of nuts and 2) blueberry pies made with blueberries from any state outside of New England will never be as sweet.

I love a chocolate chip cookie as much as the next person but I have found that the addition of cranberries – in true New England style – adds an extra special dimension. There’s something about the sweetness that comes out in dark chocolate after baking that goes so well with the tart nature of the cranberries. I hope that you cookie lovers out there enjoy trying this simple and foolproof recipe and that, time permitting, you will share your top baking memory with me.

Massachusetts Chocolate Chip and Cranberry Cookies
(Makes 20 Small Cookies)

Ingredients

1 ¼ x Cups Gluten Free Flour
½ x Teaspoon Gluten Free Baking Powder
½ x Teaspoon Gluten Free Bicarbonate of Soda
1 x Cup Dairy Free Dark Chocolate Chips
½ x Cup Dried Cranberries
¾ x Cup Light Brown Muscovado Sugar
1 x Large Egg
8 x Tablespoons Vegetable Oil
2 x Tablespoons Water
½ x Teaspoon Vanilla Extract

Method

  1. Preheat the oven to 175 degrees and line two baking trays with parchment paper.
  2. Mix all dry ingredients except the chocolate chips and cranberries in a medium sized bowl and set aside.
  3. Mix the oil, sugar, water and vanilla extract together in a large bowl.
  4. Beat the egg separately and add to the liquid.
  5. Gradually add the dry mix to the liquid, stirring in small amounts at a time. Mix until smooth.
  6. Add the chocolate chips and cranberries until equally dispersed in the mixture.
  7. Form cookies out of 1 tablespoon of dough on the baking trays, giving them enough space (the cookies grow in size in the oven!).
  8. Bake for 12-15 minutes or until lightly golden brown on the top.
  9. Leave to cool on a cooling rack for 30 minutes before eating. The cookies will remain soft and chewy!